
Table of content:
- Exporting Audio Files in FL Studio
- Export to MP3 or WAV?
- Best export settings for WAV files
- Best export settings for MP3 files
- Export WAV and MP3 at the same time
- Pros & Cons of WAV files
- Pros & Cons of MP3 files
- Exporting MIDI Files in FL Studio
- Exporting FL Studio Project Files
- Export and Save Plugin Presets
- Wrapping up
Exporting Audio Files in FL Studio
FL Studio can export audio files in a variety of formats and bitrates. The following sections will explain the different options, but first, let's look at how to access them:
Click on File > Export Audio (or press Ctrl + E). This will open a window where you can select your desired format, bitrate and other options (see below).
You can also right-click on an audio track in your project window and choose "Export Audio" from the context menu.
Now you have to choose the export settings.
Before you choose the setting let's compare the two file formats.
Export to MP3 or WAV?
First, let’s compare the two files.
MP3 files are compressed and smaller, while WAV files are uncompressed and larger. MP3 files sacrifice some audio quality for smaller file sizes, while WAV files retain the original audio data for better sound quality.
Okay, but what file format should you choose when exporting in FL Studio 21?

Here are some examples of when to export audio to MP3:
Sharing music or podcasts: If you're an independent artist or podcaster, exporting your audio files to MP3 will make it easier for your audience to download and listen to your content on various devices.
Sending audio files via email: When you need to send an audio file through email, it's best to compress it to an MP3 format so that it takes up less space and can be easily received by the recipient.
Here are some examples of when to export audio to WAV:
Professional Music Production: When working on professional music production, sound engineers and producers need the highest audio quality possible. Exporting to WAV format ensures that the audio remains uncompressed and maintains its original fidelity, allowing for further editing and mixing in the production process.
Audio for Video Projects: When incorporating audio into video projects, it is essential to maintain high-quality sound. Exporting audio to WAV format ensures that the audio will not degrade due to compression, resulting in a better overall viewing experience for the audience.
Sound Design and Effects: When creating sound effects or designing audio for games, movies, or other multimedia projects, the quality of the audio is critical. Exporting to WAV format ensures that the sound designer has access to an uncompressed, high-quality audio file that can be easily manipulated and edited to create the desired effects.
Okay, I hope you have decided on which file format suits your needs the best.
Now, let's dive into the best export settings for the two file formats in FL Studio.
The best export settings for WAV files in FL Studio
If you are planning to send this file off to a record label, then choosing a file format in 24bit Wav might be the best solution.
Go to the export options in FL Studio 21.
Select WAV file format.
Then set WAV bit depth to 24Bit int.
Under Quality, set the Resampling to 512-point sinc (it will take the longest to export, but gives the best audio quality)
Remember to tick on both “HQ for all plugins” and “Disable maximum polyphony”.
Hit “Start”.
And there you have it.
A high-quality 24-bit WAV file export in FL Studio 21.

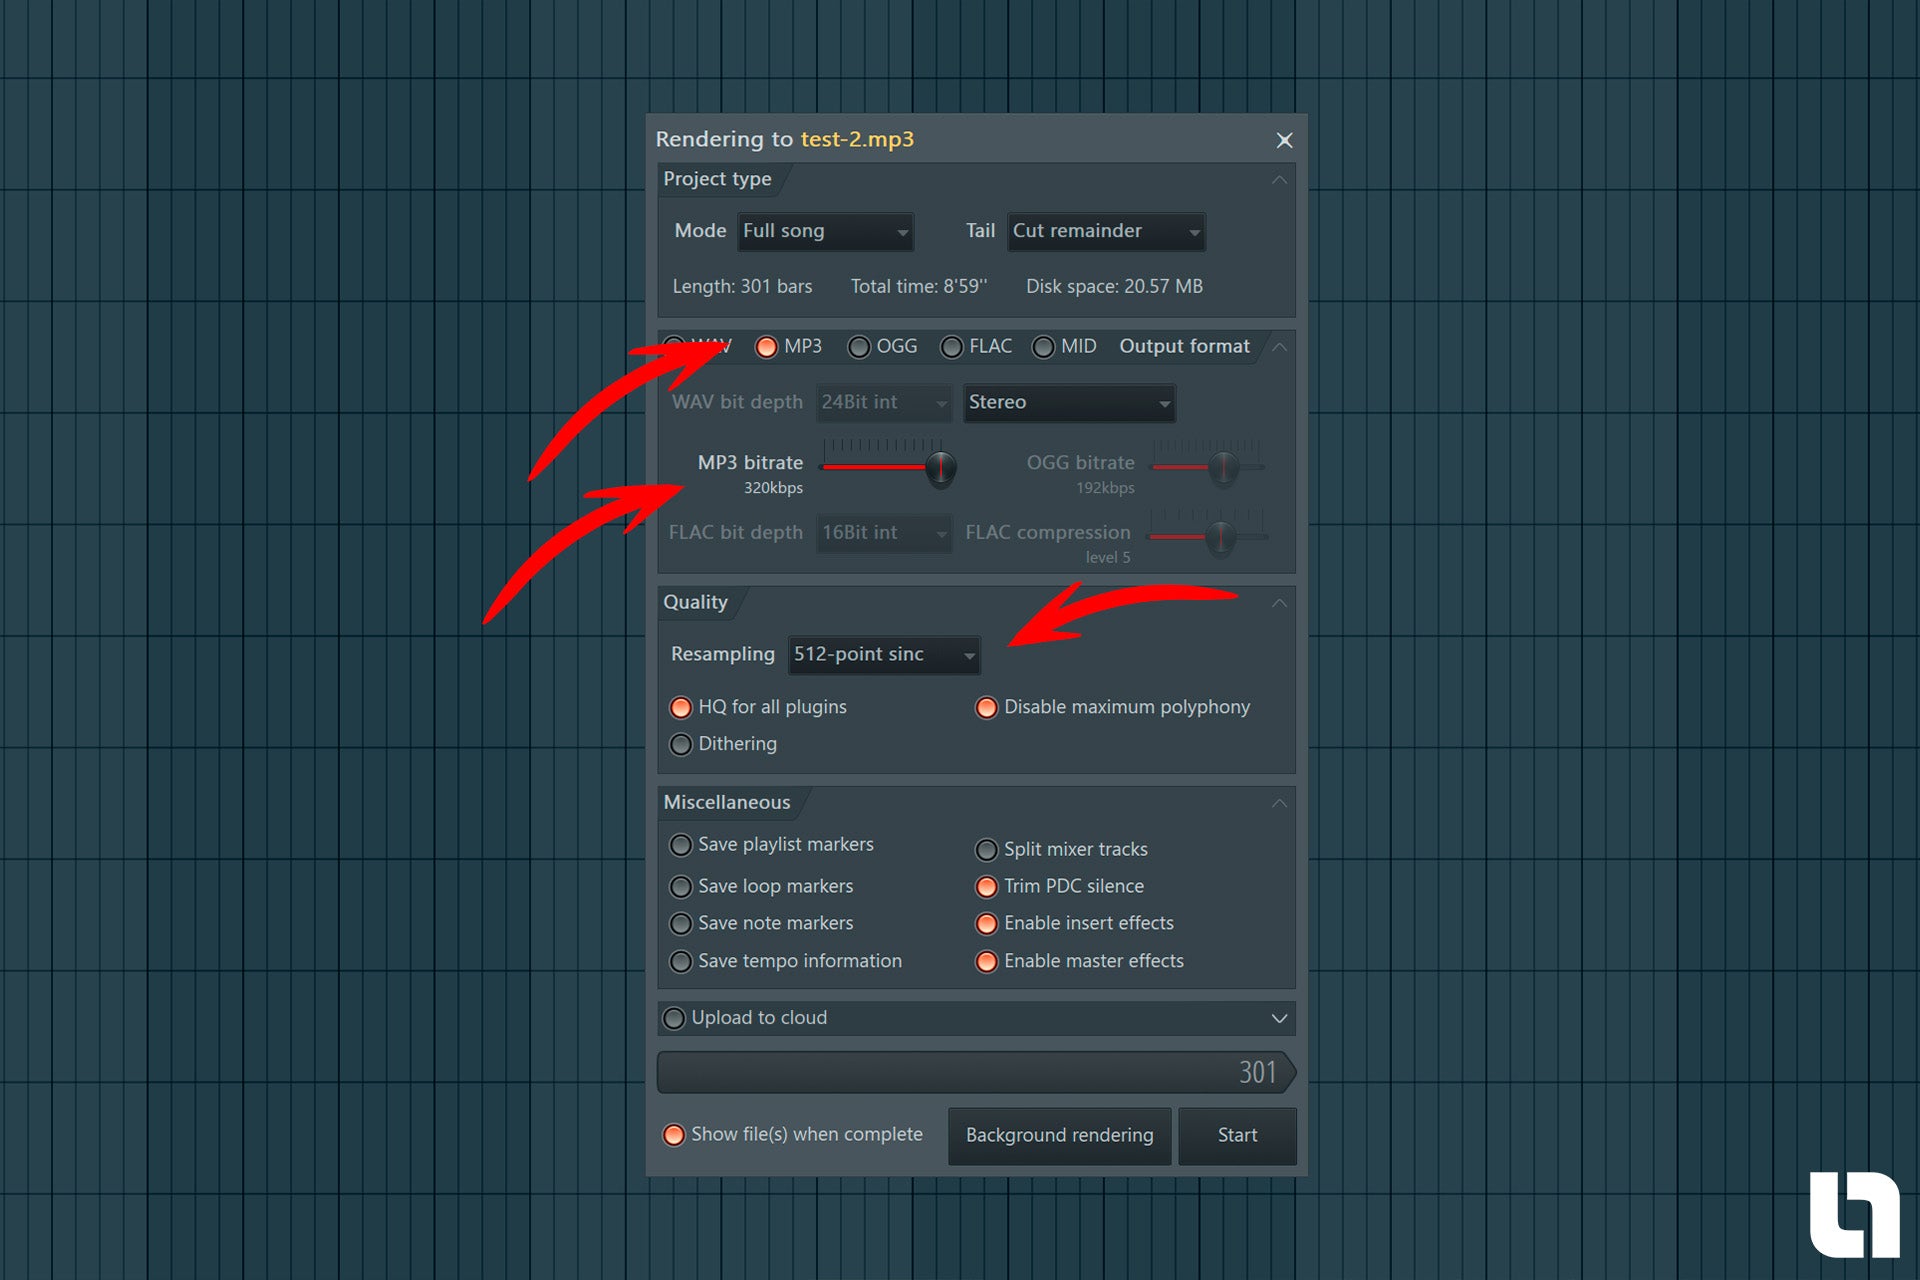
The best export settings for MP3 files in FL Studio
For MP3 file export, you can use almost the same settings as for the WAV files.
Select MP3 format.
Set the “MP3 bitrate” to 320kbps.
Under Quality, set the Resampling to 512-point sinc.
Tick on both “HQ for all plugins” and “Disable maximum polyphony”.
Export the file.
Done! Now you have a high-quality MP3 file ready to be sent out in the world.
Export MP3 and WAV at the same time in FL Studio
If you, for example, like me, want to export both an MP3 and a WAV file of your new song, you can do that pretty quickly in FL Studio 21.
Just open up the Export window and select both MP3 and WAV when exporting.
Make sure all the above-mentioned export settings for each file format are selected.
Boom. Now you have the two formats on your hard drive.

Pros and cons of exporting audio to 24bit WAV
Pros of WAV files:
Higher bit depth: Exporting audio to 24bit WAV provides a higher bit depth than other formats like 16bit. This means there's more dynamic range, which can improve the overall sound quality and allow for greater detail in the audio.
Uncompressed: WAV files are uncompressed, meaning you're retaining the original audio quality without any loss in data. This is beneficial for preserving the integrity of your recordings and ensuring the best possible sound.
Wide compatibility: WAV files are widely supported across various devices, software, and platforms. This makes it easy to share and collaborate on projects with others without worrying about compatibility issues.
Easier audio editing: Editing audio in a 24-bit WAV format can be easier because it provides more headroom for adjustments, allowing you to make precise changes without risking audio distortion.
Cons of WAV files:
Larger file size: One of the main drawbacks of exporting audio to 24-bit WAV is the larger file size. Uncompressed audio can take up a significant amount of storage space, which could be a problem if you're working with limited storage or need to share your files online.
Longer processing times: Due to the increased file size, exporting and encoding audio in 24-bit WAV can take longer than other formats. This could slow down your workflow, especially if you're working on a large project with many audio files.
Overkill for some applications: Depending on your project, 24-bit WAV audio may be unnecessary. Many consumer playback systems, such as smartphones and computers, are not optimized to handle 24-bit audio, so the extra bit depth may go unnoticed by the average listener.

Pros and cons of exporting audio MP3
Pros:
Universal compatibility: MP3 is a widely supported audio format, making it compatible with almost all devices and software. This ensures that your audio files can be played on virtually any platform.
Smaller file size: MP3 uses lossy compression to significantly reduce file sizes while maintaining a relatively high level of audio quality. This makes it an ideal format for sharing and storing audio files, especially when dealing with limited storage space or bandwidth constraints.
Easy to share: The reduced file size of MP3s makes them easier to share via email, social media, or other online platforms, allowing users to quickly and easily distribute their audio content.
Cons:
Loss of audio quality: As a lossy compression format, MP3 sacrifices some audio quality to achieve smaller file sizes. This can result in a noticeable difference in sound quality when compared to lossless formats like WAV or FLAC, particularly at lower bitrates.
Not ideal for professional use: Due to the loss of audio quality, MP3 may not be the best choice for professional applications, such as music production or mastering. In these cases, lossless formats like WAV or AIFF are generally preferred.
Not ideal for editing: Due to its lossy nature, MP3 is not the best format to use when editing audio, as each time the file is saved or exported, it undergoes further compression and quality loss. For audio editing purposes, it's better to use lossless formats like WAV or AIFF.
Exporting MIDI Files in FL Studio
Exporting MIDI files is a great way to save your work and share it with others. You can also use exported MIDI files as a starting point for new projects, which is especially helpful if you're working on a collaborative track.
MIDI files are much smaller than audio files, so they take up less space on your computer or hard drive.
They also don't require any additional software or plugins to open them--just open the file in FL Studio 21 and start editing!
The best way to Export MIDI Files:
Go to the Sequencer and open the piano roll for the specific pattern you want to save the MIDI file for.
Click the drop-down menu in the upper left corner and select “Export as MIDI file”.
Name your file and press “Start”.
Awesome. Now you can easily reuse that MIDI file for perhaps future projects or send it off to another producer.

Exporting FL Studio Project Files
Sometimes you perhaps want to send your project files to another producer or artist.
But you have to remember to include all audio files, presets and midi files in the folder. Either way, the FL Studio project file cannot open properly.
There is a very easy way to export your FL Studio Project files.
Go to “File”.
Select export and choose “Zipped Loop Package”.
Locate the folder where you want to save the Fl Studio Zip project file.
Aaand that’s it!
Now all your files used in this FL Studio project are neatly placed in one folder for easy access.
This function is a game-changer for me!

Benefits of exporting as a Zipped Loop Package in FL Studio
Easy Collaboration
When working with other musicians, producers, or engineers, you may need to share your FL Studio project files. Exporting your project as a zipped loop package ensures that all associated files, including samples, presets, and MIDI data, are included in a single, easy-to-share file. This makes collaboration more efficient and prevents any missing files or compatibility issues when sharing your work.
Backup and Archival
Exporting your project as a zipped loop package serves as an excellent way to create a backup of your work. By consolidating all the necessary files into a single archive, you can easily store your projects on external drives or cloud storage services. This not only protects your work from potential data loss but also helps you stay organized by keeping all your project files in one place.

Simplified File Management
When working on multiple projects or different versions of a project, file management can become chaotic. Exporting as a zipped loop package helps you keep all project-related files in a single archive, making it easier to manage your files and avoid confusion. This can be especially helpful when revisiting older projects or when you need to find a specific version of your work.
Seamless Transfer Between Computers
If you work on multiple computers or plan to upgrade your system, exporting your FL Studio projects as a zipped loop package ensures that all necessary files are transferred seamlessly. This eliminates the need to manually locate and copy individual files, saving you time and reducing the risk of losing important data during the transfer process.
[Also read]: How to Save Mixer Presets in FL Studio
Export and Save Plugin Presets
In FL Studio 21 you can easily export and save plugin presets for future use. It’s also a great way to share your plugin settings with other FL Studio users.
You just navigate to the plugin you want to save as a preset.
Press the options menu and select “Save preset as”.
Select the folder where you want to save the preset file.
Done.
You can save and export presets for both instrument and effect plugins in FL Studio.

Benefits of exporting and saving plugin presets in FL Studio
Time-saving: Exporting and saving plugin presets allows you to reuse your favourite settings in future projects, saving you time and effort in recreating the same sound.
Consistency: By using saved presets, you can maintain a consistent sound across multiple projects, making it easier to establish your unique sonic signature.
Collaboration: Sharing your presets with other producers and musicians can help streamline the collaboration process, as it ensures that everyone is working with the same sound settings.
Organization: Saving your presets allows you to create a library of your favourite settings, making it easier to find the perfect sound for your project.
Inspiration: Having a collection of presets can help jumpstart your creativity by providing you with a starting point for new projects or ideas.
[Also read]: How to save CPU in FL Studio
Wrapping up:
I hope this guide helped you in finding the best exporting option for your FL Studio 21 project.
If you want more FL Studio tutorials, you can swing by my YouTube channel. It's full of great tips, tricks and inspiration for your music production.
More useful FL Studio resources:
How to add MPC swing in FL Studio with Groove templates


